The A+ Programming Language
Posted Sat, Jul 11, 2009 in:
I didn’t intend for it to take me a week to write this post, but I had some technical difficulties in getting started, which prevented me from even starting to learn the language until I solved them.
I expected to run into some problems getting things set up as I worked on this project, but I assumed most of those problems would be along the lines of getting the compiler and/or interpreter for a particular language to compile or run on my machine.
What I didn’t expect was to have so many issues just getting my text to be in the encoding that the language expects, but that is exactly what I ran into with A+.
Introduction to A+
A+ is a high-level language with a large number of primitive functions for manipulating arrays of data. It was created in 1988 at Morgan Stanley by Arthur Whitney, after he decided that none of the existing APL implementations would be suitable for their purposes.
A+ is a dialect of APL, and offers some extensions, such as a graphical user interface and inter-process communication, as well a module for storing and loading objects (functions, variables, and dependencies) and even a built-in database system.
Another feature A+ adds is the ability to set up dependencies between variables, so when a depended-upon variable is changed, the dependent variable changes as well. This allows for spreadsheet-like or reactive programming, with barely any effort. Actually, combined with the graphical display capabilities, you could actually pretty easily implement a spreadsheet in A+ if you felt like it.
Any dyadic (two-argument) function can be called using infix notation, which takes a little getting used to, especially with the right-to-left no order-of-operations precedence rules.
The language uses a healthy subset of the crazy hieroglyphs included in APL, and requires a special font for properly displaying the special characters. It’s also possible to use one of two ASCII-based modes when programming in A+, but where’s the fun in that?
After playing around with the language for a while, I can see why people enjoy APL and its derivatives so much. It’s one of those language where once you wrap your brain around it, it opens up new ways of solving problems that you’d never even considered before.
My First A+ program
 I decided on a (sort-of) graphical implementation of Conway’s Life, to demonstrate both the graphical system and the array-handling capabilities of A+.
This program is special because it’s not only my first A+ program, it’s my first program in an APL-like language of any sort.
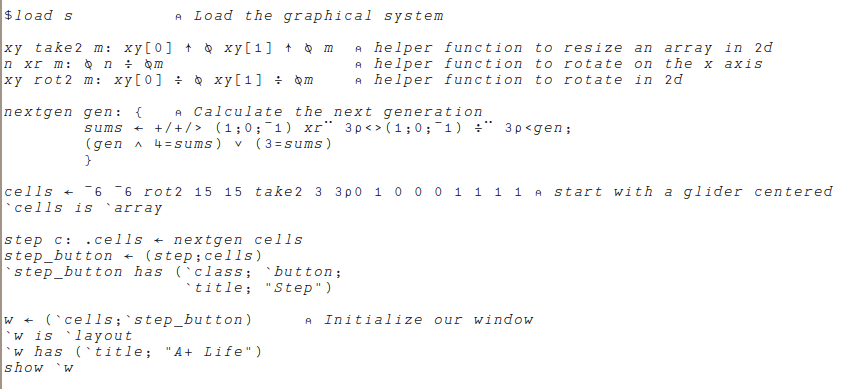
You won’t be able to copy and paste this program directly and run it from A+, because I’ve converted the symbols to unicode in hopes of having them display properly in more browsers. If they don’t display properly, you can take a look at a screen-shot of the source code.
If you would like to run it, you can download the A+ life source.
    $load s          ⍝ Load the graphical system

    xy take2 m: xy[0] ↑ ⍉ xy[1] ↑ ⍉ m  ⍝ helper function to resize an array in 2d
    n xr m: ⍉ n ⌽ ⍉m                   ⍝ helper function to rotate on the x axis
    xy rot2 m: xy[0] ⌽ ⍉ xy[1] ⌽ ⍉m    ⍝ helper function to rotate in 2d

    nextgen gen: {   ⍝ Calculate the next generation
            sums ← +/+/> (1;0;¯1) xr¨ 3⍴<>(1;0;¯1) ⌽¨ 3⍴<gen;
            (gen ∧ 4=sums) ∨ (3=sums)
            }

    cells ← ¯6 ¯6 rot2 15 15 take2 3 3⍴0 1 0 0 0 1 1 1 1 ⍝ start with a glider centered
    `cells is `array

    step c: .cells ← nextgen cells
    step_button ← (step;cells)
    `step_button has (`class; `button;
                      `title; "Step")

    w ← (`cells;`step_button)     ⍝ Initialize our window
    `w is `layout
    `w has (`title; "A+ Life")
    show `w
The most important function of the program is the “nextgen” function.
On the first line, reading from right to left, it does the following:
- Make an matrix containing 3 copies of the gen matrix
- Rotate each of those three copies verically by 1, 0, and -1 rows, respectively
- Make three copies of each of the three copies from the first step.
- Rotate the copies of copies horizontally by 1, 0, and -1 columns.
- Sum the rows and columns of matrices together into a single matrix.
On the second line, again, reading from the right to left:
- Get an matrix with any cell equal to 3 changed to 1, and any others changed to 0.
- Logically OR that matrix together with the array consisting of ones in the place of any 4s in the sums matrix, ANDed with the original gen matrix.
A more thorough explanation of the algorithm can be found at the APL wiki. You’ll notice that my version is quite different. That’s mostly because of difference in how the various build-in functions work in A+ and other APL implementations. That’s the same reason I had to implement the take2 and rot2 functions, since the A+ rotate (circle with a vertical line) and take (arrow pointing up) functions only allow you to rotate or take in a single dimension.
continue reading to learn more about A+
Anatomy of an A+ Program
A+ programs consist of files, which when loaded act exactly the same way as they would if you typed in into the interactive shell one line at a time.
Statements can include function definitions
    x plus y: x + y
    negate x: -x
    minus{x; y}: x - y
    nextgen gen: {   ⍝ Calculate the next generation
            sums ← +/+/> (1;0;¯1) xr¨ 3⍴<>(1;0;¯1) ⌽¨ 3⍴<gen;
            (gen ∧ 4=sums) ∨ (3=sums)
            }
..assignments and function calls
    five ← 2 plus 3
    four ← plus{2;2}
    negone ← negate 1
    ⍝ this is a comment
    ten ← plus/1 2 3 4 ⍝ the / (reduction) operator successively applies the function
..and that’s really pretty much it (with the exception of dependencies and control statements, I’ll let you discover those on your own).
As you can (hopefully) see, the syntax is pretty simple, with some trickiness when it comes to defining arrays and the order of operations.
Installing A+
All it took for me to install A+ was
apt-get install aplus-fsf xfonts−kapl
The aplus-fsf package is also available for several other Linux distributions, AIX, FreeBSD, NetBSD, Solaris, Tru64 Unix, IRIX, and Max OS X. If there isn’t a package in your distribution (or you are using something other than Linux, of course), you can most likely get what you need from the A+ download page.
They recommend using Emacs for A+ development, but sadly only XEmacs support seems to be provided, and it didn’t work very well for me, or maybe I’m just too used to “normal” Emacs.
After spending too much time trying to get XEmacs displaying fonts correctly and taking input as I expect it to, I found this article on getting APL working in Emacs with Unicode, which includes code to get regular Emacs working as expected, enabling entering of all the crazy symbols required to program in A+ or APL. It also provides the commands apl-aplus-to-unicode and apl-unicode-to-aplus to convert between the A+ format and unicode.
For A+, though, I actually just ended up using the keyboard mapping file provided on that UnicAPL page, and the KAPL font (as mentioned above).
I had to modify the key mapping to retain things like my arrow keys, home/end/pgup/pgdown, and I had to give it the proper keycode for my Alt Gr key.
In Emacs, you can set the font with
M-x set-default-font <enter> -*-kapl-*-*-*-*-*-140-*-*-*-*-*-*
And when editing A+ files, you’ll want to make sure you set the file encoding:
M-x set-buffer-file-coding-system <enter> latin-1
otherwise the interpreter will not recognize some of the characters.
Unless you have a set of APL key-caps, you’ll also want to keep a copy of the (A+/APL keyboard chart) handy, because otherwise you will have no idea what keys map to what symbol.
Running A+
You will want to play around with an interactive A+ shell to get the feel for some of the primitive functions and try different combinations until you start to understand how everything works.
It took me a while to figure out how to get the shell to accept any command involving one of the special characters.
To get an xterm running which will allow you to input text in the encoding that a+ expects and display characters in a font that a+ understands, use the following:
xterm -fa kapl -en 'ISO 8859-1'
This sets the font to the KAPL font and the character encoding to “latin-1” encoding. Before I figured this out, I was baffled as to why when I tried to run a+ from the command-line it would give me all sorts of “token undefined” errors, even when I copied and pasted text directly from a tutorial, or the same code would run when read in from a file.
A+ can be run in interactive mode by invoking a+, or a script can be loaded by including the name of the script to run. Of course, the script may still end up in interactive mode if it doesn’t quit the interpreter at the end of its execution.
There really is no difference between specifying a file at the command line and typeing
$load filename
from the interactive shell.
Learning more about A+
A great place to start learning more is the A+ documentation. This includes a set of tutorials which will introduce you to the various concepts and built-in function of A+, and have you comfortable with typing commands in the interactive shell and figuring things out by experimentation by the end of it.